How to renovate furniture with Oil Plus 2CUpdated 5 months ago
When to renovate
A renovation with Rubio Monocoat Oil Plus 2C, is a simple process that brings the surface back to life without requiring major sanding.
The renovation process is recommended if you need to re-introduce the original applied color. This is typically caused by not maintaining the surface properly or in the case of an accident.
Two things to keep in mind: the surface needs to be previously treated with Oil Plus 2C and there should be no deep scratches or gouges present. If this is the case, a light abrasion and re-oil will make it look like new!
A “renovation” is necessary when color restoration is required. If color restoration is not required, maintenance is done using Renew.
For an overview of the care process, please read caring for your Rubio Monocoat oil finished furniture.
Under normal circumstances, furniture that has been properly cared for should not need a renovation.
There are a couple cases though, where a renovation is required:
- If cleaning and/or maintenance is neglected, the protective qualities of the finish can become compromised and further use can result in loss of color.
- When the recommended cleaner (Surface Care Spray or properly diluted Rubio Monocoat Soap) is not used, appearance and performance issues can be expected. Both of these situations will require a “renovation” application using Oil Plus 2C to restore the appearance and protective properties of the furniture.
How a renovation works
You may be asking yourself, doesn’t the Rubio Monocoat Technology, that prevents lap lines, mean that simply introducing more product will not work because the surface will not accept more product? And you would be correct.
The trick to the renovation process is a light abrasion that opens the initially applied Oil Plus 2C finish. This means a renovation can be performed without requiring a full-on re-sand. Once abraded and cleaned, apply Oil Plus 2C the same way as an initial application.
During application, only the areas that require color restoration will accept color while the remaining areas will simply be refreshed in appearance and protection.
Let’s take a closer look at the renovation process!
Consult the TDS prior to using Oil Plus 2C.
Materials needed
- Surface Care Spray (or properly diluted Rubio Monocoat Soap)
- Easy-release painters’ tape
- Maroon Abrasion Pad (ScotchBrite material in 240-320 grit)
- Vacuum
- Gloves
- Raw Wood Cleaner
- Paint can opener
- Mixing container
- Stir stick
- Applicator Set
- Oil Plus 2C (in the original applied color)
- Supply of clean terry cloths/towels
- Water-filled metal can with a lid for safe disposal of oil-contaminated rags and pads.
Video
Application process
Preparation
- Vacuum the surface to remove all loose debris and dirt.
- Clean the surface thoroughly using Surface Care Spray.
- Allow the cleaned surface to dry.
- Lightly scuff the cleaned wood surface with a Maroon Abrasion Pad.

- Using the maroon pad, abrade the surface along the length of the grain. When the pad gets filled with dust, clean/shake it and keep using it. A maroon pad is equivalent to approx. 320 grit sandpaper. Though 320 sandpaper and a maroon pad are roughly equivalent grit, it’s easier to use a maroon pad than sandpaper when doing this process by hand due to the softness of the maroon pad. Sandpaper is paper thin and the pressure from the fingers may transfer to the surface.
- Vacuum the abraded surface thoroughly.
- Do a visual check to make sure you have not missed a spot and/or that you abraded too much in a particular area. It’s important to do an even abrasion.
- Clean the surface with a damp cloth and allow it to dry completely.

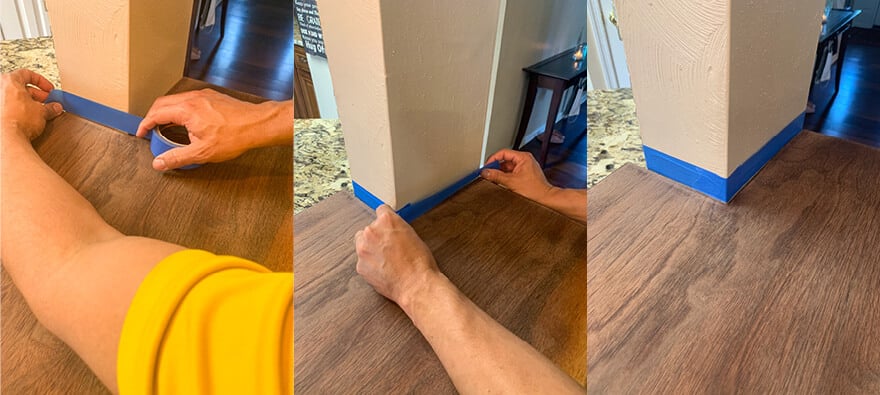
- If desired, prior to oiling the surface, tape any area that will not be finished.
Damage repairs (Optional)
Minor scratches and nicks where the wood is exposed are best reoiled with Oil Plus 2C during the renovation process and typically do not require more than that. Such minor blemishes (once re-oiled) become part of your furniture's natural patina, just like with a nice piece of leather furniture.
Significant scratches or gouges in your wood surface that are undesirable may need fixing first. If a fix is desired/required, follow the below process.
- Scrape and sand the damage out until flush.
- Blend the repair area's transition with each board's grain flow pattern or sand the entire board down to bare wood, up to a natural joint.
IMPORTANT: Sanding must mimic the original sanding process to ensure consistent color results. - Vacuum the surface.
- Clean using Raw Wood Cleaner.
- Allow to dry (approx. 15-60 minutes).
- Apply Oil Plus 2C in the original color to the raw wood area. Work the oil into the wood in a circular motion using the Rubio Monocoat Applicator Set.
- Allow the oil to react for at least 5 minutes.
- Remove all excess oil from the wood surface with a dry rag within 30 minutes.
- Clean the outside perimeter of the repair with a clean rag, blending the repair zone.
- Allow the oiled repair area to dry and cure for approximately 24-36 hours.
- Lightly rub down the oiled repair area with a piece of the maroon abrasion pad. This will blend the repair area in with the rest of the previously abraded floor.
- Remove all dust and proceed to the overall renovation process.
Renovation process
Applying Oil Plus 2C for a renovation is the same as the initial application, with the exception of the spread rate. Because the wood is already mostly saturated, a renovation gets significantly better spread rates. Always aim for the lower spread rate when estimating product usage.
 Apply Oil Plus 2C and allow to react.
 Remove the excess oil with a clean towel.
.jpg) Allow the renovated surface to cure.
Allow the renovated surface to cure.
Caution
Rags saturated in oil are combustible and require proper disposal. Here are some oily rags safety tips from the NFPA.
Cure times
View Oil Plus 2C cure times.
Tips
To set you up for success, please review the Oil Plus 2C tips.